Settling In
In this post I recount the process of going from npm create to the blog you are reading now.
While I am perfectly happy with my choice, there are some issues with the AstroPaper theme. For starters, it is not on the latest version of Astro. I was expecting some tweaks and customizations no matter which route I took, and wanted a framework that would make them easy. I’d love to see the theme author release a new version for v4, but in the meantime, we can do it ourselves.
AstroPaper has excellent documentation and I won’t be recounting the steps already detailed here like setting up my color scheme, etc. If you decide to use this theme, I strongly recommend reading the documentation from start to finish.
Before we get started, this is a good opportunity to talk about one of the benefits of a Markdown-based blog: uncompromising control over your content. If AstroPaper ever releases a v4 version, or if I find a theme I like better, migration to a new system which understands MD and MDX is very simple. I do not have to worry about database migrations or anything like that. I don’t have to pull my data out of some API. I’m not at the mercy of a proprietary editor or an opaque binary file format. I may have to do some global find/replace on my frontmatter and file paths, at most.
Upgrade to Astro V4
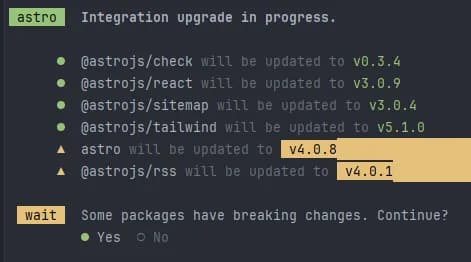
The first order of business is to get my blog onto the latest version of Astro. There are significant performance enhancements in v4, and some of the later steps I take (in particular, installing MDX) rely on me being on the latest version. I don’t want to start my blog off already a version behind, so let’s get to it.
I do not pretend to know what I’m doing here. I am too new to Astro to realize how unwise this is. I can only say nothing has broken for me… yet. This is to the great credit of the Astro team.
Run the following command to upgrade to Astro V4 per Astro’s upgrade instructions:
npx @astrojs/upgradeIgnore the scary warning message
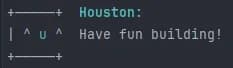
Take solace in Houston’s smile
Update npm packages
npm updateInstall MDX
Next, I install the MDX package, so I can use component-aware Markdown in my blog posts. Fortunately, MDX has an Astro integration which makes the process nearly effortless. If there is a theme you like that doesn’t use MDX, don’t hesitate to use it and add MDX yourself.
After running this command, my project went from rendering MDX as a blank page to rendering Markdown and components as it should.
npx astro add mdxSet Up Frontmatter Code Template
The AstroPaper theme has type-checked frontmatter including required fields. Nobody has time to type this stuff every time we start a new blog post, so I created a code template for WebStorm ( my weapon of choice) to make this easier.
For Visual Studio Code you may want to take a look at user defined snippets.
---
pubDatetime: ${YEAR}-${MONTH}-${DAY}T${HOUR}:${MINUTE}:${SECOND}
modDatetime: ${YEAR}-${MONTH}-${DAY}T${HOUR}:${MINUTE}:${SECOND}
slug: ${Post_slug}
title: ${Post_title}
draft: false
featured: false
tags:
  - new
description: ${Post_description}
---
The slug is above the title so that I can quickly copy and paste the File name into the Post Slug field using Tab. I use slugs, so I can organize my posts into subfolders by year and month.
Add Buy Me a Coffee to Socials
The AstroPaper theme comes with a handy social configuration tool that allows you to customize the social links in the footer with your social media connections. Sadly, it does not support Buy Me a Coffee. I’m not one to let a little issue like this come between me and my coffee, so I looked into the social mechanism and added support for Buy Me a Coffee.
Luckily, SVG Repo has our back with an awesome Buy Me a Coffee vector icon.
Add BuyMeACoffee to SOCIALS in /src/config.ts
export const SOCIALS: SocialObjects = [
  {
    name: "BuyMeACoffee",
    href: "https://www.buymeacoffee.com/stevenpeterson",
    linkTitle: `Buy me a coffee`,
    active: true,
  },
  {
    name: "Github",
    href: "https://github.com/spetersoncode",
  ...
Add BuyMeACoffee to the SocialMedia type in /src/types.ts
export type SocialMedia =
  | "BuyMeACoffee"
  | "Github"
  ...
Add the SVG from SVG Repo to socialIcons in assets/socialicons.ts
const socialIcons: SocialIcons = {
  BuyMeACoffee: `<svg fill="#000000" width="800px" height="800px" viewBox="0 0 24 24" role="img" xmlns="http://www.w3.org/2000/svg">
    <path      d="m20.216 6.415-.132-.666c-.119-.598-.388-1.163-1.001-1.379-.197-.069-.42-.098-.57-.241-.152-.143-.196-.366-.231-.572-.065-.378-.125-.756-.192-1.133-.057-.325-.102-.69-.25-.987-.195-.4-.597-.634-.996-.788a5.723 5.723 0 0 0-.626-.194c-1-.263-2.05-.36-3.077-.416a25.834 25.834 0 0 0-3.7.062c-.915.083-1.88.184-2.75.5-.318.116-.646.256-.888.501-.297.302-.393.77-.177 1.146.154.267.415.456.692.58.36.162.737.284 1.123.366 1.075.238 2.189.331 3.287.37 1.218.05 2.437.01 3.65-.118.299-.033.598-.073.896-.119.352-.054.578-.513.474-.834-.124-.383-.457-.531-.834-.473-.466.074-.96.108-1.382.146-1.177.08-2.358.082-3.536.006a22.228 22.228 0 0 1-1.157-.107c-.086-.01-.18-.025-.258-.036-.243-.036-.484-.08-.724-.13-.111-.027-.111-.185 0-.212h.005c.277-.06.557-.108.838-.147h.002c.131-.009.263-.032.394-.048a25.076 25.076 0 0 1 3.426-.12c.674.019 1.347.067 2.017.144l.228.031c.267.04.533.088.798.145.392.085.895.113 1.07.542.055.137.08.288.111.431l.319 1.484a.237.237 0 0 1-.199.284h-.003c-.037.006-.075.01-.112.015a36.704 36.704 0 0 1-4.743.295 37.059 37.059 0 0 1-4.699-.304c-.14-.017-.293-.042-.417-.06-.326-.048-.649-.108-.973-.161-.393-.065-.768-.032-1.123.161-.29.16-.527.404-.675.701-.154.316-.199.66-.267 1-.069.34-.176.707-.135 1.056.087.753.613 1.365 1.37 1.502a39.69 39.69 0 0 0 11.343.376.483.483 0 0 1 .535.53l-.071.697-1.018 9.907c-.041.41-.047.832-.125 1.237-.122.637-.553 1.028-1.182 1.171-.577.131-1.165.2-1.756.205-.656.004-1.31-.025-1.966-.022-.699.004-1.556-.06-2.095-.58-.475-.458-.54-1.174-.605-1.793l-.731-7.013-.322-3.094c-.037-.351-.286-.695-.678-.678-.336.015-.718.3-.678.679l.228 2.185.949 9.112c.147 1.344 1.174 2.068 2.446 2.272.742.12 1.503.144 2.257.156.966.016 1.942.053 2.892-.122 1.408-.258 2.465-1.198 2.616-2.657.34-3.332.683-6.663 1.024-9.995l.215-2.087a.484.484 0 0 1 .39-.426c.402-.078.787-.212 1.074-.518.455-.488.546-1.124.385-1.766zm-1.478.772c-.145.137-.363.201-.578.233-2.416.359-4.866.54-7.308.46-1.748-.06-3.477-.254-5.207-.498-.17-.024-.353-.055-.47-.18-.22-.236-.111-.71-.054-.995.052-.26.152-.609.463-.646.484-.057 1.046.148 1.526.22.577.088 1.156.159 1.737.212 2.48.226 5.002.19 7.472-.14.45-.06.899-.13 1.345-.21.399-.072.84-.206 1.08.206.166.281.188.657.162.974a.544.544 0 0 1-.169.364zm-6.159 3.9c-.862.37-1.84.788-3.109.788a5.884 5.884 0 0 1-1.569-.217l.877 9.004c.065.78.717 1.38 1.5 1.38 0 0 1.243.065 1.658.065.447 0 1.786-.065 1.786-.065.783 0 1.434-.6 1.499-1.38l.94-9.95a3.996 3.996 0 0 0-1.322-.238c-.826 0-1.491.284-2.26.613z"
    /></svg>`,
  Github: `<svg
  ...
Before

After

Deploy CSVTable
We have everything we need to create our first TSX component and make it available in our MDX files.
My least favorite thing about Markdown is the table syntax. Everything about it is bad. It is atrocious to work with, atrocious to update, and almost requires some sort of IDE assistance to make it manageable.
One quick and simple solution is to treat the tables in your documents like CSV files. Often the source of this information will quite literally be CSV files, so we might as well. While CSV files are far from perfect, I also find them an infinitely less painful way to accomplish the same goal as Markdown tables: expressing structured tabular data in plain text format with a minimum of extra markup.
To accomplish this, I have created a CSVTable component. If I want to make a basic table in MDX and I don’t have a specific repeatable structure I want to enforce, this is usually how I accomplish it.
Getting this component to work requires a few steps.
Install Papa Parse
First, we need to be able to parse CSV files. For this, we will install the Papa Parse CSV parsing library.
npm install papaparseInstall Papa Parse Type Definitions
Because Papa Parse is a JavaScript library, and we are living that TypeScript life, we also need an assist from DefinitelyTyped to pull in the type definitions for Papa Parse.
npm install --save-dev @types/papaparseAdd CSVTable Component
Finally, we are ready to add our CSVTable component.
Create a new file /src/components/mdx/csv-table.tsx
import React from "react";
import papaparse from "papaparse";

const { parse } = papaparse;

interface CSVTableProps {
  data: string;
}

const CSVTable: React.FC<CSVTableProps> = ({ data }) => {
  const parseResult = parse(data, { skipEmptyLines: true, header: false });
  const rows = parseResult.data;

  if (rows.length === 0) {
    return <p>No data</p>;
  }

  const headerRow = rows[0] as string[];
  const dataRows = rows.slice(1) as string[][];

  return (
    <table>
      <thead>
        <tr>
          {headerRow.map((header, index) => (
            <th key={index}>{header}</th>
          ))}
        </tr>
      </thead>
      <tbody>
        {dataRows.map((row, rowIndex) => (
          <tr key={rowIndex}>
            {row.map((cell, cellIndex) => (
              <td key={cellIndex}>{cell}</td>
            ))}
          </tr>
        ))}
      </tbody>
    </table>
  );
};

export default CSVTable;
Add the component to your MDX file
import CSVTable from "/src/components/mdx/csv-table";

<CSVTable
  data="
Name,Age,Phone
John,32,555-5555
Jenny,33,867-5309"
/>;
This is the result (note this is a screenshot as I no longer have papaparse installed)

Conclusion
Are you getting a sense of the power Astro brings as a blog platform? After working with it for a day or two, I sure am. Whatever features you are lacking, you can beam in from the vast ecosystem of JavaScript and web resources. You can then compose them into your own custom components and use them in your Markdown.
References
MDX
Papa Parse
Other Resources